Using layer prefab placeholders
Layer prefab placeholders contain a single root node that can be any layer in the Project > Prefabs. In your project you can treat a layer prefab placeholder like any other layer. Once referred to in a project, layer prefab placeholder instantiates an exact copy of that prefab.
Use prefabs (prefabricated templates) to create reusable content in your project.
For example, use prefabs to:
- Modularize your Kanzi project
- Separate your project into multiple views (UI screens)
- Control the loading of and application start-up times of your Kanzi application
- Create different themes for the UI in your Kanzi application
- Localize your Kanzi application
To use layer prefab placeholders, first create a prefab layer. See Creating a prefab layer.
Creating a prefab layer
To create a prefab layer:
- Right-click Project > Prefabs and create any layer you want to use more than once in your project.
For example, create an Empty Layer, and add to it a Text Layer.
- Set the properties of the layers in the prefab you created.
For example, create a custom property, add it to the Empty Layer, and use a binding to set the text in the Text Layer.
You can reuse this layer as many times as you need in your project with a Layer Prefab Placeholder. Whenever you make a change to the prefab, that change is visible everywhere in your project where you use that prefab. See Using prefab layers in your project.
or
You can make any part of your project hierarchy into a prefab, by dragging the root of the hierarchy to the prefabs folder.
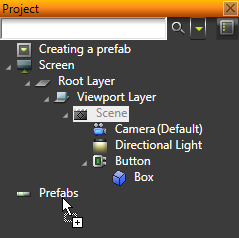
Kanzi Studio creates a prefab template for the hierarchy and replaces the original hierarchy with an instance of the prefab.

Using prefab layers in your project
To use prefab layers in your project:
- Create a prefab. See Creating a prefab layer.
For example, create an Empty Layer, and add to it a Text Layer.
- In the Project right-click in a scene where you want to use the prefab and select Create > Layer Prefab Placeholder.
- In the Properties set the Prefab Template property to the prefab you created in the first step.
To make prefabs really useful, you can modify the properties of prefab instances. See Modifying properties of prefab instances with bindings.
When using prefabs keep in mind that:
- You can duplicate a prefab placeholder like any other object.
- All properties you add to a prefab placeholder override the values you set in the prefab.
- When referencing objects inside a prefab (for example, in a message trigger or a property binding), use relative paths. Do not use the prefab itself as a target path for any messages or animations. Use only prefab placeholders.
Editing prefabs
You can edit the prefabs only in the prefab template itself or in the root object of a prefab instance. The objects inside a prefab instance are gray, if defined under the screen’s hierarchy.
Use the root object of the prefab instance to access the whole prefab instance. If you want to override the content inside the prefab instance, apply the changes to the root object, and forward them to the target property using bindings. If the value is a resource, you can use resource IDs to override the values provided in the prefab template’s dictionary.
Using triggers to add prefabs or replace objects with prefabs
You can use trigger actions to add prefabs or replace objects with prefabs in your project. For example, you can use Click trigger of a button object to instantiate a prefab, or to replace an existing layer with a prefab layer.
To use triggers to add or replace prefabs:
- In the Project create a prefab object. See Creating a prefab layer.
For example, create an empty layer, and add to it a text layer.
- In the Project create an object which you want to use as a trigger.
For example, create a button in a visible scene. See Using buttons.
- In the Properties add a trigger to the object you created in the previous step.
For example, if you created a button, use the Click trigger. See Using triggers.
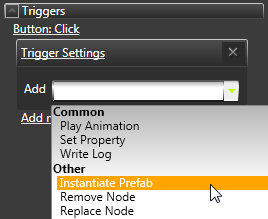
- In the Properties click the drop-down menu for your message type and select an action. Use:
- Instantiate Prefab to add the prefab to your application.
- Replace Node to replace an existing object with a prefab. When using Replace Node always set the Node To Be Replaced using a relative path.
For example, use Instantiate Prefab action.
- In the Argument Editor set:
- Source Prefab to the prefab you want to instantiate
- Target Node to the object where you want to instantiate the prefab
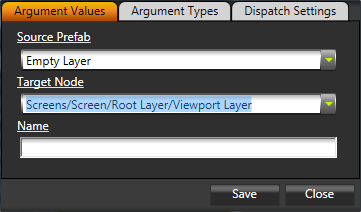
- Click Save.
Modifying properties of prefab instances with bindings
A prefab can consist a tree of objects, each with their own properties. However, a prefab instance provides access only to the properties of the root object. To change the properties inside the hierarchy of a prefab instance, add to the root object the properties you want to modify, and bind to those properties from the objects in the prefab. This can be done by defining custom properties and bindings.
This procedure shows how to use bindings and custom properties so that instances of the prefab can have individual values.
To modify properties of prefab instances with bindings:
- Create a prefab layer. See Creating a prefab layer.
For example, create an Empty Layer, and add to it a Text Layer.
- Create a custom property type. See Creating custom property types.
For example, create a custom property PrefabText and set:- Data Type property to Text
- Property Hosts property to at least Layer
- In the Project select the root object of your prefab in the Prefabs, in the Properties click Add Properties and add the custom property you just created.
If you use more than one property, add all the properties you want to modify with bindings.
For example, if the root of your prefab is an Empty Layer, add the property to the Empty Layer.
- In your prefab, create a binding from an object inside the prefab to the custom property. See Using bindings.
For example, if you created a property that sets a text value and your prefab contains a Text Layer, in the Project select the Text Layer in the prefab, and in the Properties create a binding to the property in the Empty Node.
- Instantiate your prefab object in your project with an Layer Prefab Placeholder. See Using prefab layers in your project.
- In the Project select the prefab instance, and in the Properties add all the properties for which you created bindings in the prefab.
Now you can modify the custom property value for the instance of the prefab, by setting its value in the prefab placeholder.
See also
Creating and editing prefabs
Using object prefab placeholders
Prefabs
Open topic with navigation